Combining My Love of Quilting and Nature

Monday, March 13, 2017

Dresden Plates

The other class I took at the Mid-Atlantic Quilt Show was with Susan Cleveland from Minnesota using an 18 degree Dresden plate template.  She has a different technique in which you essentially flip and sew individual Dresden segments onto a cotton circle that you have drawn and cut to the appropriate size.  The theory behind this is that your Dresden plates--when completed--will lay flat.  And this is what actually happened.
This top that I made isn't anything like her sample.    I precut my plate segments before I went to class--to save time  (and also, to cut at leisure in my own studio).  The problem was that not all 18 degree rulers are the same.  (I think my ruler was longer than hers and I started cutting at a different location on it than she did).  My plates ended up with a much smaller central hole and thus I couldn't interlock mine the way she had done in her quilt.
So, in a good way, that was a blessing because I had to come up with my own design.  I also added that black fabric behind the plates to make them stand out more against the black and white fabric background.
All in all, I really enjoyed this class and learned a few things along the way.  Susan is such a delightful person and everyone in the class responded to that.  You couldn't ask for a better day.

Friday, March 3, 2017

Storm At Sea

This  past week, I went to Quiltfest in Hampton, Virginia.  I usually go every year but for the past two years, I've had the extra fun of going with my niece and taking classes together.  She is a fairly new quilter and it's been really great watching her grow in her craft--which she manages to do in spite of a VERY busy work schedule and a child with lots of activities (oh, for the energy of twenty years past!).
Anyway, I am the one who has chosen the classes for us and, I'll have to say, last year I was a miserable failure at it.  The first class was so bad and I felt terrible that THIS was going to be my niece's first experience of having an "in-person" teacher.  The second class had a great teacher--it just wasn't something I really wanted to make.  (I took all the strips I had cut for that class and made lots of clothesline bowls--so it wasn't really wasted).
We signed up earlier this year and, thus, had a better selection of classes.  For me, Storm At Sea has always been one of those "impossible to achieve" quilts.  I've tried to do it 3 times and failed three times.  I really don't like paper piecing and tried to use regular piecing techniques and just never could get those points.  So, when I saw this class offered, I decided to bite the bullet and give it ONE MORE TRY.  I was delightfully surprised.  And I think you can see from my photo that I was also successful--at last.
The teacher was David Sirota (quiltmavendave@gmail.com) from New Hampshire.  This was really his first "big" teaching event and he did a great job.  His method is called "No More Tears" and there is no paper to pull out when you're finished.  This technique won't work on ALL paper piecing patterns, but it will on most blocks that build from the center out like this one.  He really puts on quite a show with his patter but there is a LOT of good information thrown in.  He did call my niece and me "the quiet ones" because we worked on our blocks--and watched all the others in the room respond to him.  It was very interesting.
The first day, we took a class with Susan Cleveland from Minnesota using the Dresden plate template and I think I'm actually going to finish that quilt also (no clothesline bowls this year!).  More later.

Saturday, January 21, 2017

Making Progress

When the weather is nasty and it's too cold--or overcast--to enjoy working outside, it's the perfect time to be in your studio and get some work done.  (Of course, it might also be good to actually organize and put away extraneous things that are also surrounding you as you work, but that's not nearly as much fun).
At any rate, I've made a little more progress on my next art quilt.  I've been playing around with the next step (the black border with the yellow flowers).  This is about the seventh thing that I've tried so far and is my favorite.  We'll see.  There will be more flowers on the side (and there'll be 4 sides) but, for now, I'm just thinking about it.  I made the decision that I was not going to try to finish this quilt for any particular quilt show deadline.  It will be finished when it's finished.  And I'm having more fun with that attitude.

In the meantime, I've been working on a new sample for an appliqué class I'm teaching in May.  The picture on the left is the finished appliqué before I quilted the piece and the other picture is of the finished work.  I don't think that the quilting stitching shows up particularly well but, in person, I do think that it adds life to the appliqué.  The object of this class is to show how to draw out the patterns onto WonderUnder, how to position the fusible pieces onto the background fabrics and how to stitch them down using a blanket or satin stitch.  Even the triangles are fused rather than pieced.  I had a lot of fun coming up with this small quilt and, hopefully, the students will enjoy making it, too.

Tuesday, January 10, 2017

It's A Beginning

It's always nice to get over the hump of actually starting a quilt project.  I've had two or three ideas in the last month or so but somehow I just couldn't get motivated to the point where I could choose fabrics and begin to create the image in fabric.
However, thanks to a friend talking about the quilt she was going to make, an idea began to shove itself into my consciousness.  And this is where I am in my thought process.  I really like to make quilts that radiate from the center outwards.  Of course, it CAN be a problem when you have to make either an oval or a circle that's larger than anything you can trace onto paper.  This circle is about 25 inches and I really don'thave a pot lid that large to trace!
The answer to my problem was to put a thumbtack into my cutting mat, tie a string around it and then a pencil to the other end and GENTLY pull the pencil around in a circle, transferring it to a large piece of paper.  It worked!  Of course, I had to be very careful as I was pulling because that thumbtack just didn't want to stay in position.
So, this has been my first step.  These designs are fused on and later I will sew them down permanently.  I'm now beginning to move outward.
And my next section is going to look something like this.  Of course, it can still change.  Who knows what it will say to me if I really listen.  But, the main thing is--I'm having fun.  And that's the most important part.

Wednesday, January 4, 2017

Christmas Tidings


Like most of you, I was pretty busy during the Holidays--making cookies, wrapping presents, decorating the house and the tree, cooking large dinners both on Christmas Eve and on Christmas Day.  But I also managed to make three or four Christmas-themed small quilts.

All three of these quilts were made from commercial patterns and it was enjoyable because I really didn't have to think about it too much.  Low stress for the holidays.  The table runner WAS a little different because the existing pattern was for a tree skirt and I didn't want to make that.  So I just decided how long I wanted the table runner to be and arranged the components from the tree skirt into the new space.  And I really enjoyed using it throughout the Holiday.
The circular deer cutout on the bottom quilt was somewhat more tedious to make because of all the cutting and fusing of one large unit.  However, this is the third time that I've made this particular quilt.  The original pattern does not have the four black corners but I wanted to leave open the option to use it as a wallhanging.
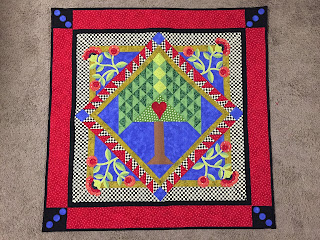
The top quilt I just made because the tree of life appealed to me.  Somebody will probably get it as a present down the road.  The fourth quilt I made went out as a present before I got a picture taken.  So--for now--I'm finished with my Christmas marathon.   Next up?  I'm beginning work on an original piece which I'll post as I progress.  Like most of my original quilts, at this point, I have no idea where it will end up--design-wise.  I guess we'll just have to wait and see!
Happy New Year.

Tuesday, November 29, 2016

The Weight of The World

This week I finished the quilt that I've been working on for a while and I've named it The Weight of The World.
 I think the theme is self-explanatory.  I really do think that time is running out--maybe not in my lifetime, but probably sooner than we want to think unless we all come together to preserve our endangered planet.  I really believe that if each of us did what we could and if world leaders did what they could things such as melting icebergs and diminished forest lands--and so much more--could be turned around.  But it would take a major shift in our thinking and behavior.  And I do get discouraged when I see the lack of recycling participation in my own neighborhood.  Really--how much effort does it take to put bottles into a blue bag for pickup?  And if we can't do the little things, then . . .well.

O.K., enough of that.  I just need to let my quilts occasionally reflect my concern and this is one of them.  But back to the actual quilt.  When I had finished quilting it, I wasn't completely happy with the result. I looked at it for a day or so and finally decided to add the black fusible bias tape around the perimeter.  This made it feel complete.  And, so, sometimes, just putting our work aside and waiting to see what idea may overtake you is the thing to do rather than "making do".  You never know what might be just around the corner.

One final comment.  I do think that a faced edge can be the best way to finish off many quilts rather than a binding.  And I usually make one with a mitered corner--which can be a real hassle.  When I took the class with Susan Brubaker Knapp, she talked about the more simple facing that I've used here.  I tried it and I liked it.  It was neater and much simpler to manage.  She has a free download on her website, www.BlueMoonRiver.com, where you can find the info if you'd like to try for yourself.

Tuesday, November 22, 2016

Snowflake Class

I don't often take classes anymore but when I learned that Susan Brubaker Knapp was coming to our Guild, I signed up right away.  I have admired her work for quite a while and I knew for sure that I would learn something new from her.  And I did--lots of things, actually.  Most of them small--but it's often the small things that make our quilting life more exciting, aren't they?
The class that she was teaching was thread sketching and the graphics were snowflakes (kind of appropriate this week with the onset of cold weather).

This is her class sample.  She had a bit to say about the direction of the wind on the snowflakes which you'll see shortly that apparently to which I didn't pay close enough attention.
In order to draw the graphics onto our DARK fabrics, we used a Lightbox.  For the most part, that worked pretty well but many of us (including me) had to sort of fill in the details because we couldn't see the individual lines very clearly.  I viewed that as an asset really because we each ended up with a more individual piece that way.


Susan is one of the best teachers that I have ever had the pleasure of learning from.  She is totally accessible to each student and has a giving personality.  She has spent a LOT of time honing her craft and developing her style and she shares the result of that time spent with her students.  As a teacher myself, I found it very inspiring.   
AND . . .she brought lots and lots of quilts.  Not only is she good but she's also prolific!

 And here are the results of my time in her class. Not only do I seldom take classes, but even more seldom do I finish the class sample.  This one, I did and I had a grand time doing it.  And note the difference in how my wind sketching doesn't blow against the snowflakes.   Oh well.  Another lesson learned.