Combining My Love of Quilting and Nature

Thursday, June 15, 2017

An Artist's Date


This is an article that I have written for our Guild July Newsletter and I thought I would also share it with those who read my blog.


            Don’t you sometimes feel as if you’ve hit a stumbling block in the creative side of your quilting journey?  You can’t decide what color would look great in a particular part of a block or the background you’ve chosen for your appliqué just doesn’t do what you have hoped it would?  We’ve all been there—it just doesn’t FEEL right (and if it doesn’t feel right then . . .well, you know).

            One of the things that has helped me over the years is the book, The Artist’s Way by Julia Cameron.  What has really stuck with me is the importance she places on a weekly “art date,” the theory being that when you immerse yourself in some form of art it will refresh your spirit and open yourself to ways in which you can make your own work more enlivened.

            Do I have an “artist’s date” every week?  No—but I try to do that in some way as often as possible.  This past week, three other quilters in our Guild and I spent the day going to each other’s gardens.  The ride to their homes went through pastoral countryside and their gardens were inspiring—both in design and beauty—and humor.  Can you help but smile at this rooster?  The day ended with conversation and a feeling that we had communicated in a way that went beyond words.  And I was  inspired not only to make my own yard a more beautiful place but also I was full of energy to translate the riot of color and texture into a future quilt.  Who knows, there may be a rooster in my quilt future!

Another way to have an “artist’s date” can be a very simple thing.  A week or so ago, I was at Beginnings Quilt Shop for a Quilt Show Wrap Up meeting.  While sitting there, I happened to look up at the wall near me was figuratively knocked in the face with the quilt blocks that were made by Linda Voltz.  The colors she used in those blocks!  It was a real WOW.  My eyes kept going back to them the entire time I was there.  They were so beautiful and that was most definitely an encounter with art.

            So . . .treat yourself to an “artist’s date” whenever you can.  I can guarantee you’ll feel better—and so will your quilts.


Thursday, June 8, 2017

South Carolina Quilts

Today, we trekked down the mountain to Landrum, South Carolina to see the Quilt Show put on by the Landrum Quilt Guild.  Several years ago, I presented my Trunk Show there and they were a great group of women, asking a lot of interesting questions and just generally making me feel welcomed.
One thing I noticed about their show today was that there were far more pieced quilts than appliquéd ones.  I don't know if that means anything--it's just what I noticed.  Also, they don't award ribbons per se.  When you enter, you are given a ballot and are supposed to vote for the one you like best in every category and I guess the winners are announced later.  (I'll have to admit that I didn't read up on that aspect ).  My husband and I sort of felt overwhelmed by the process and chose not to fill out the ballot but we saw some that we really liked.

This was probably my favorite quilt of the entire show.  A very small thread-painted piece and so beautiful.

We were impressed by both the bird and the background quilting in this wallhanging.  It had a really great use of quilting patterns to enhance the feeling of flight.

On the above quilt we liked the intensity of color and we absolutely LOVED this clock.  When I was a potter, I used to make clocks all the time and I have made one in fabric--but nothing like this!  I made me happy just to look at it.  I'm thinking there may be a sun-quilt in my future . . .


So, no, I didn't choose any pieced quilts as my favorites from the show.  There were some very nice ones there but I think that because there were so many --in comparison to the appliqué--it was just more difficult for any to stand out.  Or maybe I just lean towards the appliqué because that's mostly what I do.  I guess it's something to ponder.
All in all, it was a nice show and the quilters who were on duty while I was there were super nice and friendly.  A great combination which resulted in a great experience!

Thursday, June 1, 2017

It's Not The Same

This past week or so was spent with my two cousins--Annie from California and Le from New Mexico.  Before five years ago, I hadn't seen Le since I was 12 years old. (and, believe me, that was a LONG time ago!).  I had seen Annie more recently and have really enjoyed getting to know her as an adult.  We have so many similar interests that I have in common with no one else in my family.  And it was a relief to discover that as sometimes I have felt like a wanderer in a vast wasteland when it comes to familial commonalities.
And then I reconnected with Le--with whom I discovered even more similarities.  She loves to quilt and she loves to garden and is an accomplished and experienced grower of food.  I didn't know that and it was a blessing to learn of it and to share time with her.
This visit was the third time she has come East to stay with us and the second time Annie has come at the same time.  My poor husband--3 women at one time.  There weren't many edges in which he could insert himself.  Whew!  He did get some revenge when we played Liverpool Rummy and he won three times in a row.  How's that for being noticed?  He also enjoyed the variety of cooking that came with my cousins.  Le likes spicy foods--which I can't tolerate--so he had someone to share those with.  And Annie likes to pitch in and help to cook whatever's on the menu and to add her own interpretation.  My kitchen has been busy.
After Annie returned home to Santa Cruz, Le and I headed over to Mary Jo's in Gastonia, NC.


 If you haven't been there before, you can get an idea of the size of the store by this picture which represents about 1/3 of its space.  I've been there many times, but not recently.  I had been told that there was less fabric because of the addition of a sewing machine sales area.  When I got there, I saw it and also a very large classroom area.  I'm sure that both changes are loved by many--especially those who live in the area--and probably make sense from  a business perspective, but I was very disappointed.  In the past, I have really enjoyed the abundance of batik fabrics and that is no longer the case.  I know things change and time moves on, but I won't be too tempted to drive almost two hours to this fabric store anymore.

After we had finished whatever shopping we were going to do at Mary Jo's, we headed around the corner to Lowell, NC to the Bernina store, Sew Much Fun.  I was happy from the moment I walked into the shop.  It was just a wonderful atmosphere and the fabric drew me in immediately.  Lots and lots of batiks and, for me, batiks that I like to use in my appliqué quilts--not too much of the large graphics--just subtle patterns that work well for me.  These are what I bought that day--along with a new batting to try--Quilter's Dream Orient.  It felt really nice.


And look at the beautiful daylily that was in my garden today.  Some of these fabrics are going to be just right.  So . . .while I was very disappointed at Mary Jo's, the trip was a great success once we got to Sew Much Fun.  Now I know where I'll find wonderful batiks in the future.  And--I had a great time with Le.  What more could I want?  Well, I guess we wanted a good lunch before heading home--and found it at Cheddars close by.  No complaints there!

Monday, May 29, 2017

Solid Quilting

We went to the gardening show in downtown Hendersonville this past Saturday and, in addition to beautiful plants, I purchased this wooden quilt block.  I don't call it a barn quilt block for two reasons.  #1 is that it's not going on a barn and #2 is that I'm displaying it indoors on my screen porch and #3 (oops--3 reasons!) is that it is smaller than a traditional barn block.  It is only 24" x 24" and is done in natural woods rather than colored paint.  I really love it.  It emphasizes the natural woods and bark from this region and I think that it will last longer on a screen porch than if I hung it outside on the house.  My best purchase ever at the garden show.  Yay!

Thursday, May 18, 2017

Starting A New Project

I make a fair number of wallhangings that are centered around flowers or other things in nature and people always wonder how I take a small photo and turn it into a large wallhanging.  Well, my little piece of magic software is Excel.  And this is, more or less, how I do it:


This is a picture of a mushroom cluster that I took in 2008, thinking that someday I would make it into a quilt.
I then inserted the picture into my Excel program, changed some settings, dragged the image across the screen to the size I wanted and printed it out as separate sheets. (and, no, this is NOT the mushroom--just an example.  After it is printed out, I trim the appropriate edges and glue the entire piece together--ending up with quite a much larger image.  You can make it as large as you want really.  I guess it would depend on the resolution of the original photo.
This is my glued-together mushroom.  If you look closely, you can see some of the edges of paper.  You can also see where I drew in dark lines to use for my appliqué pattern.  
The next step is to trace the entire pattern/picture (meaning, in this case, the mushrooms) onto thin tracing paper.  I number each object within the drawing, label that side as TOP, turn it over and then trace the separate objects onto Wonder-Under.  Tedious?  You Betcha  . . .but ultimately worth the effort.
After I fuse the Wonder-Under patterns onto fabric, I cut them out.  Then I turn the tracing paper pattern to the TOP side, place it under a teflon ironing sheet and fuse together sections of the quilt appliqué, using the pattern underneath as a guide.
You know, I'm getting kind to tired just thinking about doing all of this.  But, for some reason, I REALLY enjoy doing it.  And here are the results so far.  Of course, it's far from finished--but it's also far from just beginning.  There are still things to add and other things to figure out--but a challenge can be a good thing, right?  This piece will be about 34" x 38" when I finish--unless I add some sort of border treatment--which is a fair amount larger than a 4" x 6" photo!


Thursday, May 11, 2017

A Nice Thing

The Western North Carolina Quilt Guild had its Quilt Show last weekend and it was a very nice show.  Lots of really nice quilts and equally nice quilters.  It was my first time to participate as a member and to see how all of the pieces fit together.  And fit, they did.  Our Show co-chairwomen were experienced and the venue, Bon Clarken, was great.  And there is no BUT.
BUT, something very nice happened to me AFTER the show.  This is one of the quilts that I entered into the show.  (It actually won a Merit award for "Best Message." ) This quilt means a lot to me because our world and our responsibility to preserve it mean a lot to me--and I hope to you.  A lovely man saw this quilt and wanted to own it because he, too, is very concerned that our time is running out.  He really GOT what I was trying to say.  He came to my home with some friends and visited, sharing his perceptions and commitment to doing what he can for our future.  And he left with this quilt.   And I was happy.  What better home could it find?

Wednesday, May 10, 2017

My Trip Top Cabarrus Quilters Guild

This week I had the pleasure of traveling to the Cabarrus Quilters Guild in Concord, NC to present a trunk show and to teach a class on fusible appliqué .  And what a great time I had.  The members of this Guild are so welcoming.  They meet in the parish hall of a local church, using the "seated around a table" format with encourages conversation, I think.  By the time the meeting began, all the tables were full and the members were in full visiting and sharing mode.  It was wonderful.   Another thing that was wonderful--from my perspective--was that they asked me lots of questions about my quilts and genuinely wanted to know what methods I used, how I choose my threads and fabrics and other insightful questions.  I always love it when that happens.  And, by the way, they had dessert!
The next day, at another church with a great classroom space, I taught the class on fusible appliqué.
 You can see here some of the students hard at work--and work, they really did!  The two ladies in this first photo are Ono and Charlotte who are the Program Chairs and they were great.  So kind and thoughtful, making sure that I had everything that I could possibly need.  Thank you, Ono and Charlotte!
So, I arrived home, tired but with. great memories--and look what I saw upon my arrival . . .The first peony bloom of the season.  How beautiful.

Monday, March 13, 2017

Dresden Plates

The other class I took at the Mid-Atlantic Quilt Show was with Susan Cleveland from Minnesota using an 18 degree Dresden plate template.  She has a different technique in which you essentially flip and sew individual Dresden segments onto a cotton circle that you have drawn and cut to the appropriate size.  The theory behind this is that your Dresden plates--when completed--will lay flat.  And this is what actually happened.
This top that I made isn't anything like her sample.    I precut my plate segments before I went to class--to save time  (and also, to cut at leisure in my own studio).  The problem was that not all 18 degree rulers are the same.  (I think my ruler was longer than hers and I started cutting at a different location on it than she did).  My plates ended up with a much smaller central hole and thus I couldn't interlock mine the way she had done in her quilt.
So, in a good way, that was a blessing because I had to come up with my own design.  I also added that black fabric behind the plates to make them stand out more against the black and white fabric background.
All in all, I really enjoyed this class and learned a few things along the way.  Susan is such a delightful person and everyone in the class responded to that.  You couldn't ask for a better day.

Friday, March 3, 2017

Storm At Sea

This  past week, I went to Quiltfest in Hampton, Virginia.  I usually go every year but for the past two years, I've had the extra fun of going with my niece and taking classes together.  She is a fairly new quilter and it's been really great watching her grow in her craft--which she manages to do in spite of a VERY busy work schedule and a child with lots of activities (oh, for the energy of twenty years past!).
Anyway, I am the one who has chosen the classes for us and, I'll have to say, last year I was a miserable failure at it.  The first class was so bad and I felt terrible that THIS was going to be my niece's first experience of having an "in-person" teacher.  The second class had a great teacher--it just wasn't something I really wanted to make.  (I took all the strips I had cut for that class and made lots of clothesline bowls--so it wasn't really wasted).
We signed up earlier this year and, thus, had a better selection of classes.  For me, Storm At Sea has always been one of those "impossible to achieve" quilts.  I've tried to do it 3 times and failed three times.  I really don't like paper piecing and tried to use regular piecing techniques and just never could get those points.  So, when I saw this class offered, I decided to bite the bullet and give it ONE MORE TRY.  I was delightfully surprised.  And I think you can see from my photo that I was also successful--at last.
The teacher was David Sirota (quiltmavendave@gmail.com) from New Hampshire.  This was really his first "big" teaching event and he did a great job.  His method is called "No More Tears" and there is no paper to pull out when you're finished.  This technique won't work on ALL paper piecing patterns, but it will on most blocks that build from the center out like this one.  He really puts on quite a show with his patter but there is a LOT of good information thrown in.  He did call my niece and me "the quiet ones" because we worked on our blocks--and watched all the others in the room respond to him.  It was very interesting.
The first day, we took a class with Susan Cleveland from Minnesota using the Dresden plate template and I think I'm actually going to finish that quilt also (no clothesline bowls this year!).  More later.

Saturday, January 21, 2017

Making Progress

When the weather is nasty and it's too cold--or overcast--to enjoy working outside, it's the perfect time to be in your studio and get some work done.  (Of course, it might also be good to actually organize and put away extraneous things that are also surrounding you as you work, but that's not nearly as much fun).
At any rate, I've made a little more progress on my next art quilt.  I've been playing around with the next step (the black border with the yellow flowers).  This is about the seventh thing that I've tried so far and is my favorite.  We'll see.  There will be more flowers on the side (and there'll be 4 sides) but, for now, I'm just thinking about it.  I made the decision that I was not going to try to finish this quilt for any particular quilt show deadline.  It will be finished when it's finished.  And I'm having more fun with that attitude.

In the meantime, I've been working on a new sample for an appliqué class I'm teaching in May.  The picture on the left is the finished appliqué before I quilted the piece and the other picture is of the finished work.  I don't think that the quilting stitching shows up particularly well but, in person, I do think that it adds life to the appliqué.  The object of this class is to show how to draw out the patterns onto WonderUnder, how to position the fusible pieces onto the background fabrics and how to stitch them down using a blanket or satin stitch.  Even the triangles are fused rather than pieced.  I had a lot of fun coming up with this small quilt and, hopefully, the students will enjoy making it, too.

Tuesday, January 10, 2017

It's A Beginning

It's always nice to get over the hump of actually starting a quilt project.  I've had two or three ideas in the last month or so but somehow I just couldn't get motivated to the point where I could choose fabrics and begin to create the image in fabric.
However, thanks to a friend talking about the quilt she was going to make, an idea began to shove itself into my consciousness.  And this is where I am in my thought process.  I really like to make quilts that radiate from the center outwards.  Of course, it CAN be a problem when you have to make either an oval or a circle that's larger than anything you can trace onto paper.  This circle is about 25 inches and I really don'thave a pot lid that large to trace!
The answer to my problem was to put a thumbtack into my cutting mat, tie a string around it and then a pencil to the other end and GENTLY pull the pencil around in a circle, transferring it to a large piece of paper.  It worked!  Of course, I had to be very careful as I was pulling because that thumbtack just didn't want to stay in position.
So, this has been my first step.  These designs are fused on and later I will sew them down permanently.  I'm now beginning to move outward.
And my next section is going to look something like this.  Of course, it can still change.  Who knows what it will say to me if I really listen.  But, the main thing is--I'm having fun.  And that's the most important part.

Wednesday, January 4, 2017

Christmas Tidings


Like most of you, I was pretty busy during the Holidays--making cookies, wrapping presents, decorating the house and the tree, cooking large dinners both on Christmas Eve and on Christmas Day.  But I also managed to make three or four Christmas-themed small quilts.

All three of these quilts were made from commercial patterns and it was enjoyable because I really didn't have to think about it too much.  Low stress for the holidays.  The table runner WAS a little different because the existing pattern was for a tree skirt and I didn't want to make that.  So I just decided how long I wanted the table runner to be and arranged the components from the tree skirt into the new space.  And I really enjoyed using it throughout the Holiday.
The circular deer cutout on the bottom quilt was somewhat more tedious to make because of all the cutting and fusing of one large unit.  However, this is the third time that I've made this particular quilt.  The original pattern does not have the four black corners but I wanted to leave open the option to use it as a wallhanging.
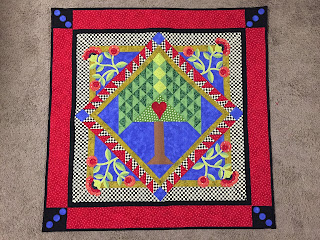
The top quilt I just made because the tree of life appealed to me.  Somebody will probably get it as a present down the road.  The fourth quilt I made went out as a present before I got a picture taken.  So--for now--I'm finished with my Christmas marathon.   Next up?  I'm beginning work on an original piece which I'll post as I progress.  Like most of my original quilts, at this point, I have no idea where it will end up--design-wise.  I guess we'll just have to wait and see!
Happy New Year.